こんにちは、Workaholicです。
今回は「Let’s Encrypt」を利用して無料SSL証明書発行を行い、自宅サーバで運用しているこのブログでも「https化」をすることが出来ました。経緯の説明と手順について解説していきます。
・経緯
このブログは貸しサーバを利用せずに、自前のサーバにてWordPressを構築し公開しています。
ドメインは「お名前.com」で取得しています。あとでSSLの設定をしようとしたらしばらく放置してしまい
ようやく重い腰を上げて導入しようと思ったら貸サーバ使用していない時の証明書発行料が1年で26,400円!!
結構いいお値段がするので今回は無料で使用できる「Let’s Encrypt」を活用することにしました。
・手順
・環境確認
CentOS7.9 + Apache2.4
OS
#  cat /etc/redhat-release
CentOS Linux release 7.9.2009 (Core)
Apache
#httpd -v
Server version: Apache/2.4.6 (CentOS)
・Certbot クライアントのインストール
# yum install epel-release
# yum install certbot python-certbot-apache・証明書の発行
以下コマンドを発行し証明書の発行を行います。
# certbot certonly --webroot -w <Apacheドキュメントルート> -d <対象URL>

例)
certbot certonly --webroot -w /var/www/html/ -d www.test.com
# certSaving debug log to /var/log/letsencrypt/letsencrypt.log
Plugins selected: Authenticator webroot, Installer None
Enter email address (used for urgent renewal and security notices)
(Enter 'c' to cancel):<メールアドレス>- - - - - - - - - - - - - - - - - - - - - - - - - - - - - - - - - - - - - - - -
Would you be willing, once your first certificate is successfully issued, to
share your email address with the Electronic Frontier Foundation, a founding
partner of the Let's Encrypt project and the non-profit organization that
develops Certbot? We'd like to send you email about our work encrypting the web,
EFF news, campaigns, and ways to support digital freedom.
- - - - - - - - - - - - - - - - - - - - - - - - - - - - - - - - - - - - - - - -
(Y)es/(N)o: N←※Electronic Frontierにメールアドレスを共有するか?Noでも大丈夫です。成功していれば以下のように証明書が作成されています。
# ls -l /etc/letsencrypt/live/www.test.com/
合計 4
-rw-r--r-- 1 root root 692  9月 18 03:07 README
lrwxrwxrwx 1 root root  47  9月 18 03:27 cert.pem -> ../../archive/www.test.com/cert.pem
lrwxrwxrwx 1 root root  48  9月 18 03:27 chain.pem -> ../../archive/www.test.com/chain.pem
lrwxrwxrwx 1 root root  52  9月 18 03:27 fullchain.pem -> ../../archive/www.test.com/fullchain.pem
lrwxrwxrwx 1 root root  50  9月 18 03:27 privkey.pem -> ../../archive/www.test.com/privkey.pem
・設定
「 /etc/httpd/conf.d/ssl.conf 」の内容を作成した証明書のパスに書き換えます。
対象は以下3つです。
SSLCertificateFile
SSLCertificateKeyFile
SSLCertificateChainFile
# vi /etc/httpd/conf.d/ssl.conf
...
SSLCertificateFile /etc/letsencrypt/live/www.test.com/cert.pem
SSLCertificateKeyFile /etc/letsencrypt/live/www.test.com/privkey.pem
SSLCertificateChainFile /etc/letsencrypt/live/www.test.com/chain.pem
...
firewallでhttps(443)を通しておきます。
# firewall-cmd --add-service=https --zone=public --permanent
# firewall-cmd --reload
httpdのプロセス再起動します。
# systemctl restart httpd・Cronによる更新処理
証明書の有効期限は3か月の為、期限を迎える前に「certbot renew」コマンドを実行する必要性があります。
更新用のコマンド一つと、httpdプロセスの再起動を行えばよいので以下内容をCronに登録します。
※毎月1日の午前4時に「 certbot renew 」と「 systemctl restart httpd 」を実行する。
# crontab -e

00 04 01 * * certbot renew && systemctl restart httpd

:wq!(上書き保存)
・ルータのポート設定
使用されているルータのポート開放設定は忘れずに実施しましょう。
http(80)は閉じ、https(443)ポートを開放します。
手順は各自ルータのマニュアルを参照して実施してください
・最終確認
ブラウザでhttpsを付けて開いてみましょう。
URL左側の南京錠マークをクリックすると「Google Chrome」であれば以下のよう画面が表示されます。
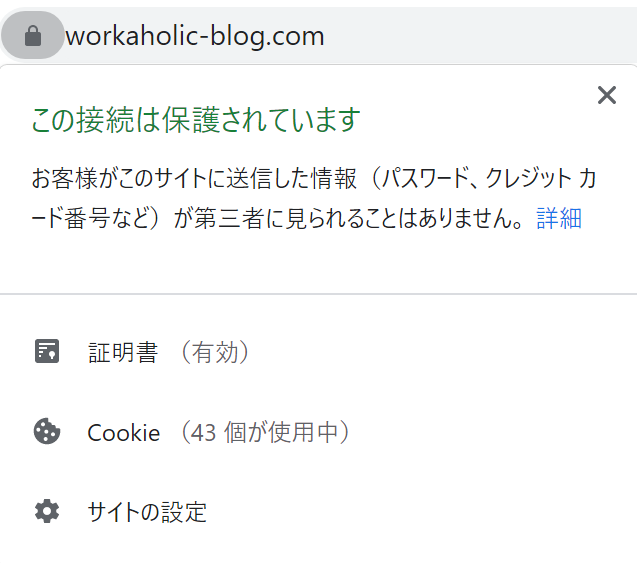
さらに証明書をクリックすると有効期間が確認できます。
Cronで正しく更新できているかたまに確認をしてあげてください

・最後に
意外と単純な作業でWebサイトのSSL化をすることが出来ました。
10分もかからず簡単に導入が出来ましたので、ズボラな自分にもありがたい限りです。
※作業をする前には必ずWordPressのバックアップを取ってから実施しましょう。


コメント